
这一部分属于实现起来很简单,但是要弄懂需要了解很多知识的类型。
32位(保护模式)的变化
- 地址空间扩展到0xffffffff
- 寄存器变成32位,ax -> eax,并且多了一些寄存器如edi、esi之类
- 两个额外的通用段寄存器fs和gs
- 更复杂的内存分段方式:段保护,可实现虚拟内存,不同的段寻址方式
切换的方法
-
使用
cli禁用中断,因为32位下的中断和16位的完全不同,即使能够跳转到BIOS设置的16位中断例程,也会因为不同的分段方式而崩溃 -
传递给CPU GDT(global descriptor table)描述符
lgdt [ gdt_descriptor ] -
执行切换:更改cr0的第一个位来进行实际的切换
mov eax , cr0 ; To make the switch to protected mode , we set or eax , 0x1 ; the first bit of CR0 , a control register mov cr0 , eax ; Update the control register -
通过far jump来刷新CPU流水线管道,防止预取的16位指令出现错误
jmp <segment>: <address offset>
段描述符
段描述符是32位下定义了段属性的8字节结构,如下图所示。
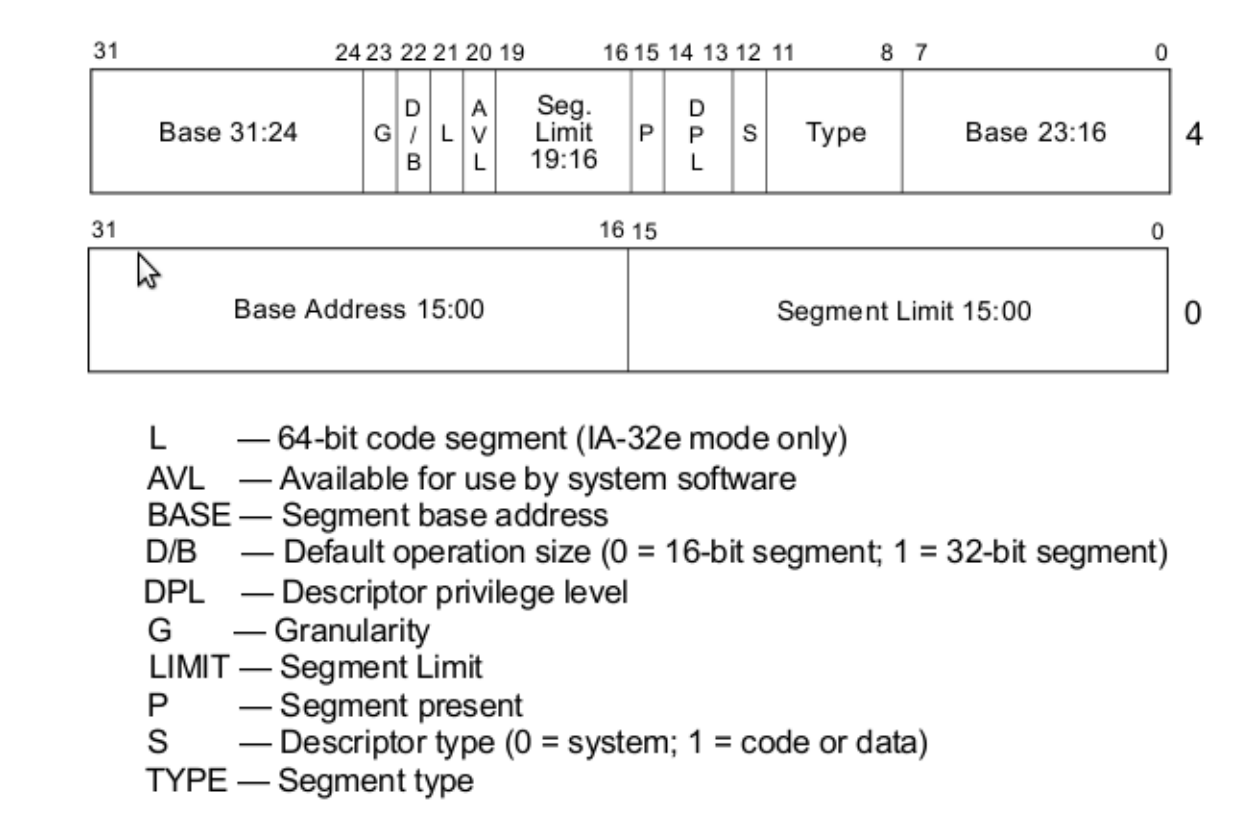
Granularity——if set, this multiplies our limit by 4 K, so our 0xfffff would become 0xfffff000 (i.e. shift 3 hex digits to the left), allowing our segment to span 4 GB of memory.
Type in code seg:
- Code——1 for code
- Conforming——Do not corming it means code in a segment with a lower privilege may not call code in this segment - this a key to memory protection
- Readable——1 if readible, 0 if execute-only.
- Accessed:——This is often used for debugging and virtual memory techniques, since the CPU sets the bit when it accesses the segment
Type in data seg:
- Code——0 for data
- Expand down——This allows the segment to expand down
- Writable—— This allows the data segment to be written to, otherwise it would be read only
- Accessed——This is often used for debugging and virtual memory techniques, since the CPU sets the bit when it accesses the segment
全局描述符表GDT
GDT是一个表数据结构,用来存放所有段描述符。
我们将使用Intel手册中最简单的可用配置:basic flat model,定义两个重叠的段,覆盖完整的4GB可寻址内存,一个是代码段,另一个是数据段,也就是说没有保护,也没有分页,
除此之外,CPU还要求GDT中的第一个描述符为空,因此定义GDT如下:
; GDT
gdt_start:

gdt_null:
	dd 0x0
	dd 0x0

gdt_code:
	dw 0xffff 		; limit(0-15)
	dw 0x0 			; base(0-15)
	db 0x0 			; base(16-23)
	db 10011010b	; (present)1 (privilege)00 (descriptor type)1
					; (code)1 (conforming)0 (readable)1 (accessed)0
	db 11001111b	; (granularity)1 (32bit default)1 (64bit seg)0
					; (AVL)0 limit(16-19)
	db 0x0 			; base(24-31)

gdt_data:
	dw 0xffff 		; limit(0-15)
	dw 0x0 			; base(0-15)
	db 0x0 			; base(16-23)
	db 10010010b	; (present)1 (privilege)00 (descriptor type)1
					; (code)0 (expand down)0 (writable)1 (accessed)0
	db 11001111b	; (granularity)1 (32bit default)1 (64bit seg)0
					; (AVL)0 limit(16-19)
	db 0x0 			; base(24-31)

gdt_end:

CODE_SEG equ gdt_code - gdt_start
DATA_SEG equ gdt_data - gdt_start
GDT 描述符(GDT Descriptor)
我们在切换时实际要传递给CPU的结构,他包括了GDT的大小和起始地址,结构如下所示:
gdt_descriptor:
	dw gdt_end - gdt_start - 1 		; less 1 of true size
	dd gdt_start
详细实现
在nasm中需要指定32位的代码和16位的代码,如[bits 32]和[bits 16]
[org 0x7c00]
;test code to switch to 32bits
start:
	mov bp, 0x8400
	mov sp, bp

	mov bx, state_16
	call print_str_16

	call switch_to_32

	jmp $

%include "./print_hex_16.asm"
%include "./print_str_16.asm"
%include "./print_str_32.asm"
%include "./gdt.asm"

[bits 16]
switch_to_32:
	cli

	lgdt [gdt_descriptor]

	mov eax, cr0
	or 	eax, 0x1
	mov cr0, eax

	jmp CODE_SEG:init_32

[bits 32]
init_32:
	mov ax, DATA_SEG		;change seg regs
	mov ds, ax
	mov ss, ax
	mov es, ax
	mov fs, ax
	mov gs, ax

	mov ebp, 0x90000
	mov esp, ebp

	mov ebx, state_32
	call print_str_32
	ret

state_16 db 'now in 16 bits mode.', 0x0d, 0x0a, 0
state_32 db 'now in 32 bits mode.', 0x0d, 0x0a, 0
times 510 - ($ - $$) db 0			; filled with 0x00
dw 0xaa55							; magic num of bootsecto
最喜欢的运行
